


How to Make a DIY Aqua Scope: See Clearly Underwater for Just a Few Dollars

Updated: Sep 23
If you've ever stood in crystal-clear water but still couldn't see what was beneath the surface, you're not imagining it.
Even on the clearest days, sunlight reflecting off the water creates glare that makes it surprisingly difficult to spot shells, shark teeth, fish, crabs, or other marine life.
That's where an aqua scope- also called a bathyscope- comes in.
It's basically a simple underwater viewing window that blocks surface glare so you can look straight down into the water. Think of it as giving yourself a crystal-clear window into the ocean, lakes, or rivers.
Our kids absolutely love using it to search for fish, crabs, and other marine life, but we've found ourselves reaching for it just as often. Whether we're paddleboarding, kayaking, shelling, or hunting for shark teeth, it has become one of our favorite pieces of DIY beach gear.
The best part? You can build one in less than an hour with inexpensive materials from your local hardware store. We got everything from Home Depot and spent less than $30!
What You'll Need
PVC pipe: 4"
PVC DWV Hub x FIPT Female Adapter- 4"

This is what the "Hub" looks like Clear plexiglass (acrylic sheet)
Clear waterproof caulk
Rubber tubing (to fit around the viewing end, to protect your face)
Two handles
PVC cement or hardware for attaching handles (if needed)
Painter's tape
Sandpaper
Tools
Marker
Jigsaw, band saw, or rotary tool for cutting plexiglass
Sandpaper
Rubber mallet or hammer
Step 1: Tape the Plexiglass
Before cutting the plexiglass, cover both sides with painter's tape.
This simple step helps reduce chipping and cracking while you cut and also gives you an easy surface to draw your cut line.

Step 2: Trace the Circle
Stand the PVC Hub on top of the taped plexiglass and use it as a template.
Trace around the outside of the pipe with a marker. This will become the viewing window that fits inside the bottom of your scope.

Step 3: Cut the Plexiglass
Carefully cut along the traced line.
Take your time- there's no prize for speed here. A slow, steady cut helps produce a cleaner edge and reduces the chance of cracking the acrylic.

Remove the painter's tape.
Step 4: Smooth the Edges
Lightly sand the cut edge of the plexiglass until it's smooth.
You don't need to remove much material- just knock down any rough or sharp edges so it seats nicely inside the PVC Hub.

Step 5: Create the Waterproof Seal
Run a generous bead of clear waterproof caulk around the inside bottom edge of the PVC Hub.
Press the plexiglass down into the Hub until it rests evenly on the bead of caulk.
Once it's seated, run another bead of caulk around the top edge where the plexiglass meets the PVC.

This creates a waterproof seal from both sides.
Allow the caulk to cure completely according to the manufacturer's directions before taking your scope into the water.
Step 6: Attach the PVC Pipe
Using a rubber mallet (or gently tapping with a hammer), press the PVC pipe into the Hub.
This creates the finished body of the aqua scope.

Step 7: Install the Handles
Attach a handle to each side of the scope.
Having two handles makes it much easier to hold steady while looking into the water, especially if you're standing in small waves or using it from a paddleboard or kayak.

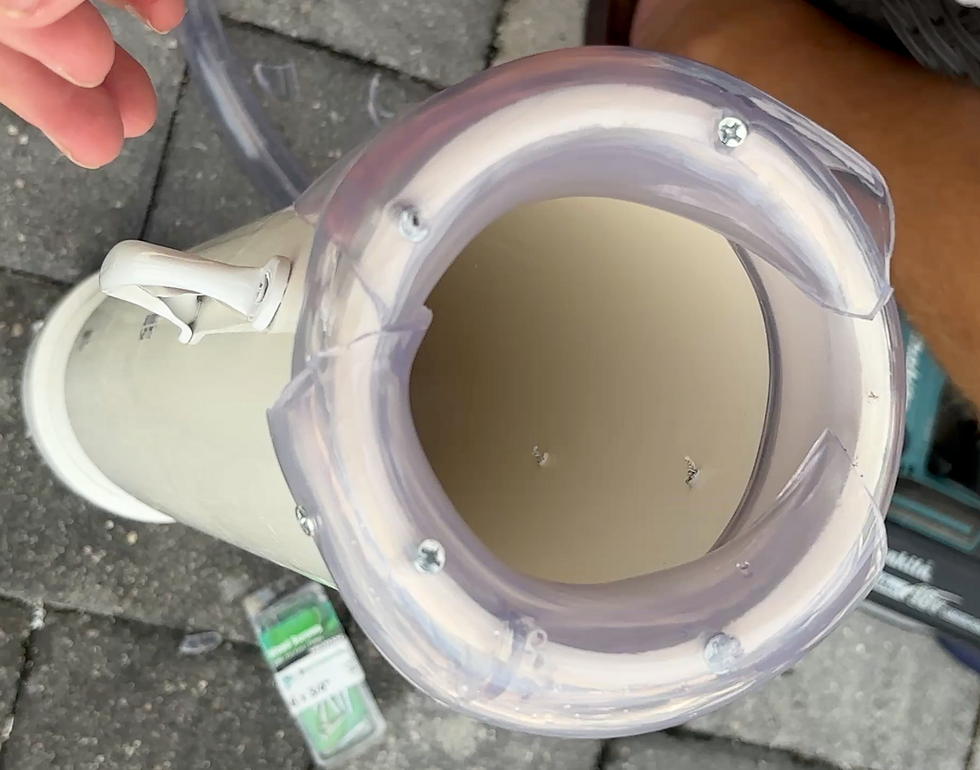
Step 8: Add the Rubber Face Cushion
Slide the rubber tubing around the top edge of the PVC pipe- the end you'll place your face against.
This simple addition makes the scope much more comfortable to use and helps block out extra light while you're looking into the water.
Ours isn't very pretty on the end, but it protects our faces and works well.
You're Done!
Once the caulk has fully cured, your DIY bathyscope is ready for the beach.
Simply place the viewing window beneath the water's surface and look through the top. Because the tube blocks reflected light, you'll be amazed how much more you can see.

What We Use Ours For
While kids love using it to search for marine life, we've found ourselves using it constantly, too.
Some of our favorite uses include:
Shark tooth hunting
Spotting shells before picking them up
Looking for crabs, fish, and sea stars
Exploring seagrass beds
Paddleboarding and kayaking
Checking what's beneath the surface without getting your face wet
Watching marine life with kids
It's one of those simple projects that costs very little to make but completely changes how you experience a day at the beach.
A Few Tips Before You Go
Calm water provides the clearest views.
Midday sunlight usually offers the best visibility.
Avoid dragging the plexiglass across rocks or shells to help prevent scratches.
Rinse everything with fresh water after each use to extend its life.
Always observe marine life responsibly and leave living animals where you found them.
Whether you're introducing kids to the underwater world or searching for your next great shark tooth, this simple DIY makes exploring ocean waters even more magical.
DIY Aqua Scope FAQs
What is an aqua scope (bathyscope)?
It's a tube with a clear window on one end. When you hold the window just under the surface and look through the top, it blocks the glare and reflection so you can see straight down into the water. You'll also see them called underwater viewers or viewing tubes.
How much does it cost to make?
We bought everything at Home Depot and spent less than $30. If you already have caulk, sandpaper, and a saw at home, it can cost even less.
How long does it take?
The build takes less than an hour. The longest part is waiting for the caulk to fully cure, so check the directions on your tube and plan to make it at least a day before your beach trip.
What size PVC pipe should I use?
We used 4-inch PVC pipe with a 4-inch PVC DWV hub adapter on the bottom to hold the plexiglass window. A 4-inch opening is wide enough for kids and adults to see a good patch of sea floor.
Can kids use it?
Absolutely - that's who ours was made for! The two handles make it easy for little hands to hold steady. Have an adult do the cutting and sealing, then let the kids take over at the beach.
When will I see the most?
Calm, clear water and midday sun give you the best view. It's also a great option for kids who don't like putting their face in the water with a snorkel mask.
More beach adventures to try with kids: How to Find Mole Crabs on Florida Beaches and How to Blow a Conch Shell.
Looking for more DIY projects? Check out our shark teeth sifter here.
About the author. Kate is a Florida-based mom of two and the writer behind SunshineFamGuide. She's been camping in the Keys for over 20 years, moved her family from Denver to Southwest Florida, and personally visits every park, beach, spring, and cruise she writes about...usually with two kids and a bucket of gear in tow.

Comments